

Table of Contents
With the latest version of Windows 10 (version 2004) it is finally possible to use MSIX App Attach in Citrix without any special adaptation.
MSIX App Attach allows you to store applications for virtual environments outside a virtual machine in a VHD/X file. Such an application can thus be integrated into the user session if required.
What is MSIX App Attach ?
MSIX App Attach is based on the concept where the application is stored in MSIX format in a central location and integrated into the operating system. After embedding, applications look like locally installed applications to both the user and the operating system. When combining FSLogix Profile Containers and MSIX App Attach, the Golden Master Image’s operating system remains completely clean and data, profiles and applications are completely separated.

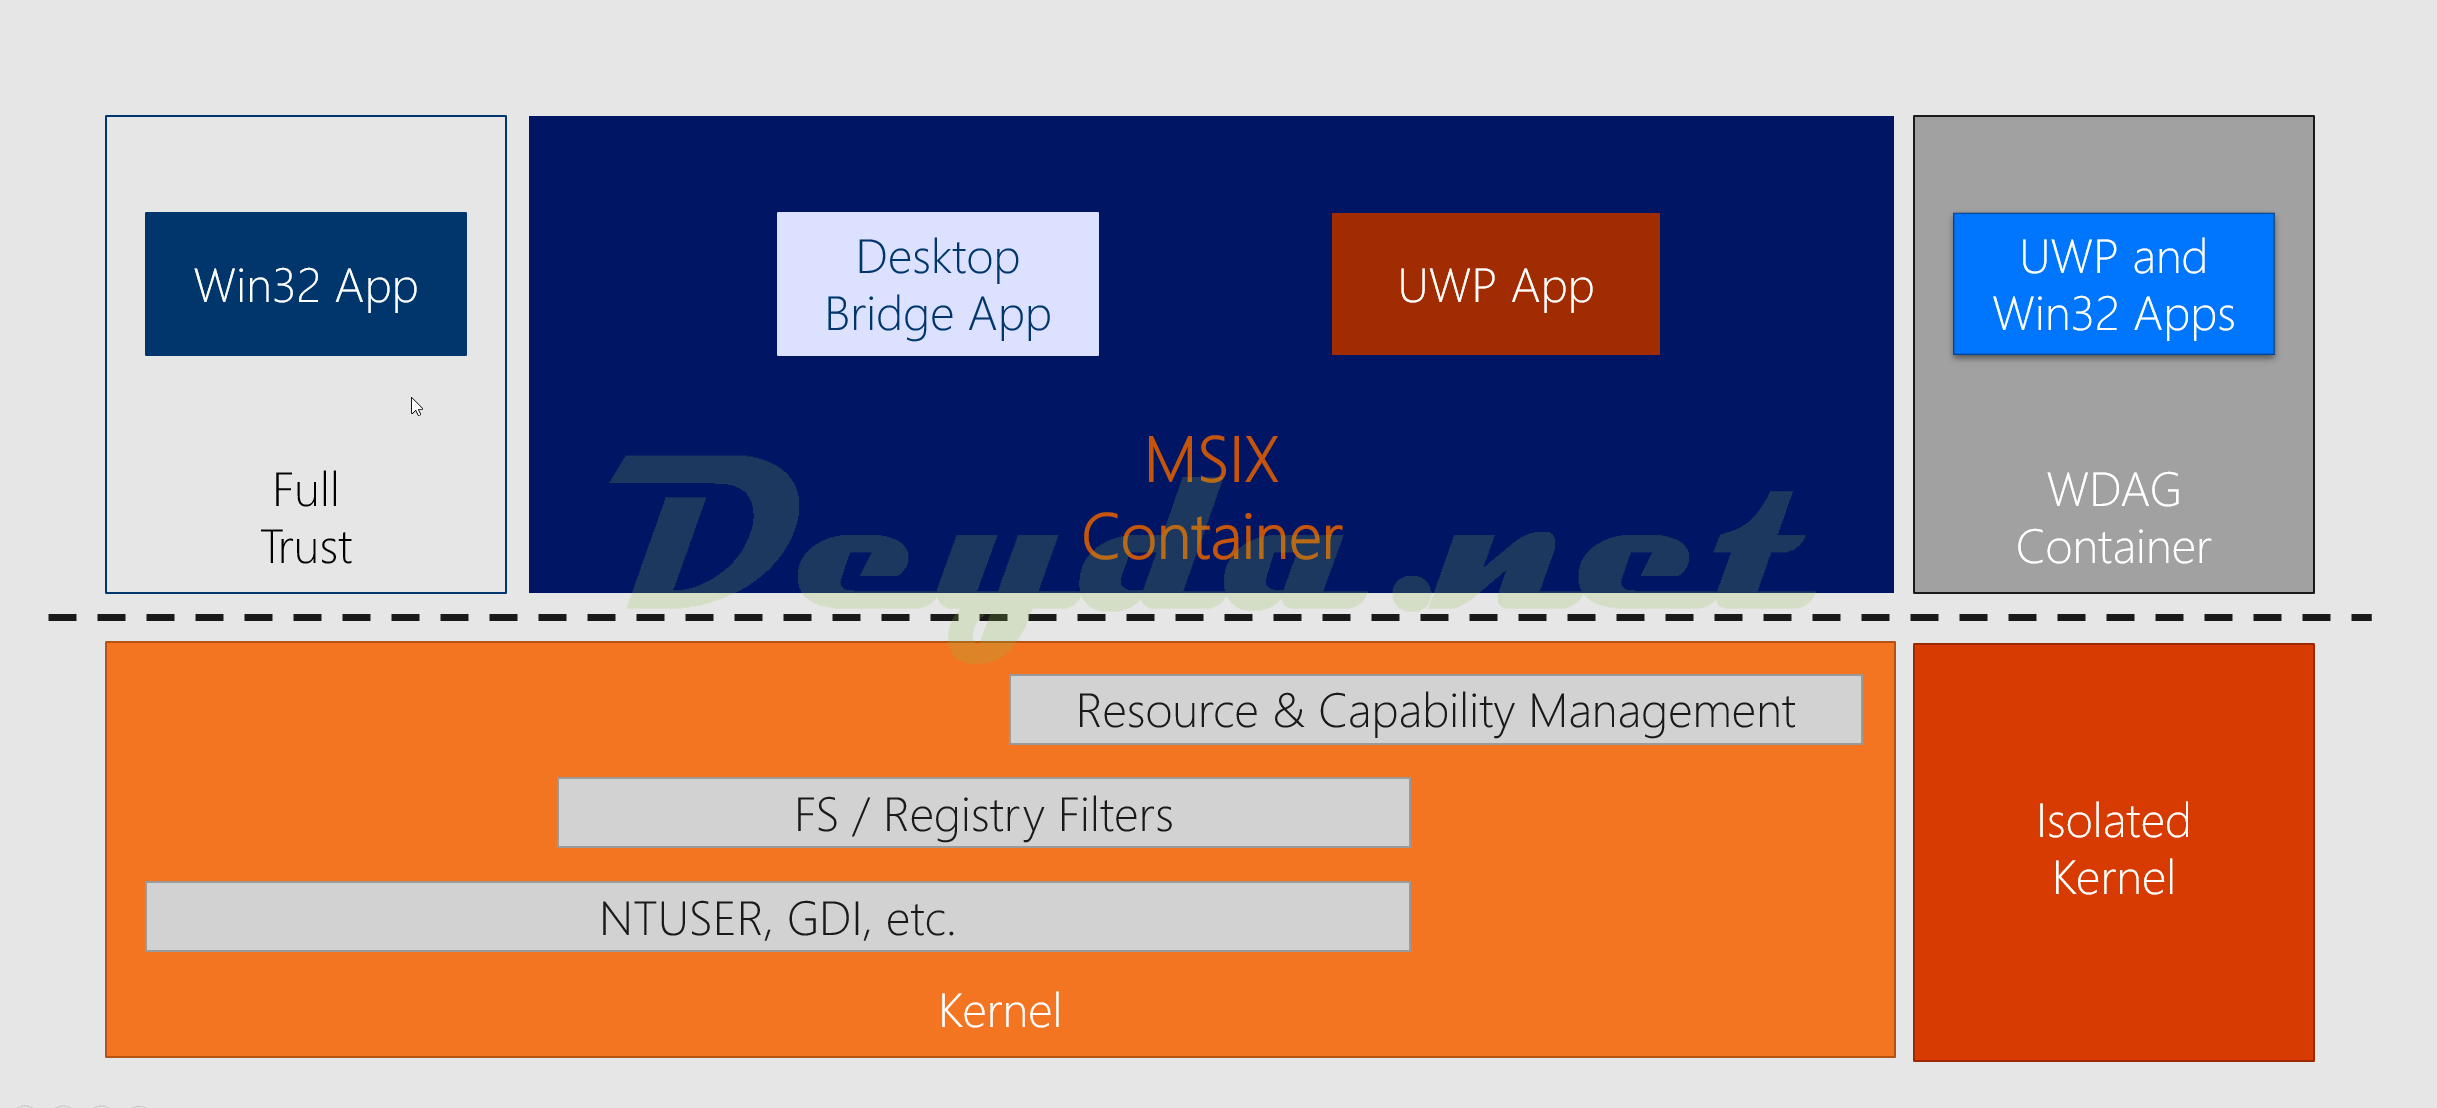
MSIX, announced at Windows Developers Days in 2018, is a new universal package format designed for Windows 10 applications. Desktop, mobile and all other Windows 10 devices are supported. Microsoft presented MSIX as an improved version of the AppX package (originally used only for UWP applications) to better support traditional desktop applications on Windows 10 by bringing the knowledge from the MSI and App-V packages and the Desktop Bridge program.
An MSIX package is very similar to an AppX or App-V package in terms of structure. It is basically a zip package that contains your application files and some XML configuration files. The main difference that MSIX has brought is its advanced support for Win32 applications, i.e. the standard desktop applications that we have used all these years. This makes it possible to package normal desktop applications and offer them centrally, taking advantage of all the new benefits of modern Windows APIs.
Just like complete UWP applications, Win32 converted applications (packed as MSIX) can access the UWP APIs. From a Win32 application, only the desktop APIs can be accessed, while from a full UWP application, various APIs (Mobile, Xbox, HoloLens, …) can be accessed.
Requirements
- Citrix Virtual Apps & Desktop Environment
- Windows 10 (Minimum Version 2004 or Insider Preview Version 19041 ) – A machine for creating the packages & the machines for deploying the applications
- Microsoft Active Directory environment (network share for the scripts and packages)
- An Internal or External Certificate (with CN=Organization Name)
File Server Share
For the MSIX App Attach Containers we create a central share from which they can be started later.
- Connect to the file server via mstsc
- Create a folder and share it (here MSIX$)

- It’s important that the domain computers are also authorized to access the share


Windows 10 machine for package creation
We are preparing a separate Windows 10 machine to create the MSIX packages and the VHD/X files. For this we need at least the above mentioned Windows 10 version and integrate the system into our Active Directory domain.
Machine preparation
- Start an administrative CMD

- The following commands should then be executed:
|
1 2 3 4 5 6 7 8 9 10 11 12 13 14 15 |
rem Disable Store auto update: reg add HKLM\Software\Policies\Microsoft\WindowsStore /v AutoDownload /t REG_DWORD /d 0 /f Schtasks /Change /Tn "\Microsoft\Windows\WindowsUpdate\Automatic app update" /Disable Schtasks /Change /Tn "\Microsoft\Windows\WindowsUpdate\Scheduled Start" /Disable rem Disable Content Delivery auto download apps that they want to promote to users: reg add HKCU\Software\Microsoft\Windows\CurrentVersion\ContentDeliveryManager /v PreInstalledAppsEnabled /t REG_DWORD /d 0 /f reg add HKLM\SOFTWARE\Microsoft\Windows\CurrentVersion\ContentDeliveryManager\Debug /v ContentDeliveryAllowedOverride /t REG_DWORD /d 0x2 /f rem Disable Windows Update: sc config wuauserv start=disabled |

Note! To create and configure the empty VHD/X files based on scripting, the Hyper-V feature is required on the machine.
- Start an administrative PowerShell

- Execute the following command.
|
1 |
Enable-WindowsOptionalFeature -Online -FeatureName Microsoft-Hyper-V -All |

If this is not desired, the steps regarding VHD/X creation can be done manually later.
Self-Signed Certificate
For the later MSIX packages we need an internal or external certificate. This must then be bound with the package and stored on the respective target computers in the Certificate Store Local Machine\Trust People. In my manual I create a self-signed certificate, which I can then distribute to the target computers via GPO or WEM.
- Start an administrative PowerShell
- Run the following command to get a self-signed certificate
|
1 |
New-SelfSignedCertificate -Type Custom -Subject "CN=<Name der Organisation>" -KeyUsage DigitalSignature -KeyAlgorithm RSA -KeyLength 2048 -CertStoreLocation "cert:\LocalMachine\My" |
Example:
|
1 |
New-SelfSignedCertificate -Type Custom -Subject "CN=CA-DEYDA" -KeyUsage DigitalSignature -KeyAlgorithm RSA -KeyLength 2048 -CertStoreLocation "cert:\LocalMachine\My" |

Because we can only store the certificate in Certificate Store Local Machine\My or Current User\My via script. We need to export the certificate and import it into the correct store.
- Start the MMC via Start > Run and enter mmc. Confirm this with OK

- Now click on File > Add or Remove Snap-ins
- In the following menu click on Certificates and on Add
- In the next window, select Computer account and click on Next
- Confirm this with a click on Finish

- Then click on OK

- Under Certificates (Local Computer) > Personal > Certificates go to the certificate that was created (here CA-DEYDA).
- Right-click on the certificate and click on All Tasks > Export

- Select the item Yes, export the private key and click on Next

- Choose Personal Information Exchange – PKCS #12 (.PFX). Notice that the items below (Include all certificates in the certification path if possible / Enable certificate privacy) are also selected.
- Confirm this with Next

- Enter a password in the following window under Password and Confirm password
- Click Next to confirm

- Click on Browse… in the following window
- Select a directory and a file name (here MSIXAppAttach.pfx) and click on Save

- Acknowledge the entry with Next

- Confirm the export in the next window with Finish

- The following confirmation will then follow

Note! To be able to execute the later packets on the machine, the certificate just created must be stored under Certificates (Local Computer) > Trusted People.
- Open the MMC Certificates for Local Computer on the target system again
- Right-click on the Trusted People folder and then click All Tasks > Import…

- Click on Next

- Click on Browse… in the following window
- Click on the file types next to File name and select Personal Information Exchange
- Now select the newly created certificate (here MSIXAppAttach.pfx) and click Open

- Confirm selection with Next

- Enter the specified password under Password and click on Next

- In the following window click on Place all certificates in the following store and on Browse…
- Select Trusted People and confirm this with OK

- Now complete the import process with a click on Finish

MSIX Packaging Tool
Now we can start packing an application into a MSIX package. For this we need the MSIX Packaging Tool, because the manufacturers don’t offer us many MSIX packages yet and therefore we have to create them ourselves.
- Download the tool in the current version from the Microsoft site (or the Insider version from here)

- Unzip the file and start the installation

- Alternatively, the tool can also be installed via the Microsoft Store

- Now starts the tool with administrative rights

- Accept the Send diagnostic data message

- In the actual tool there are 3 different tasks
- Application package – This can be used to create a package in MSIX format from an application (e.g. msi or exe Installer)
- Modification package – This will create a Modification package. Modification package are MSIX packages that contain customizations or personalizations (e.g. plugins or add-ons)
- Package editor – Allows you to open existing MSIX packages to view and edit their content or properties
- Via the displayed gear symbol you can edit the settings of the tool

- There you can store the required certificate for all upcoming packages, e.g. via Signing preference, so you don’t have to select it every time you create a package

- Now click on Application package to create a new package

- Select Create package on this computer and click on Next

- In the next step (Prepare computer) the system is checked for possible incompatibilities, in my example Windows Search was still active
- Select the Recommend action items and click on Disable selected
- Confirm this with a click on Next

- Now click on Browse… (If the certificate has not been defined via Settings before, this has to be defined as well)

- Click on the installer to be packed into the MSIX file and on Open
- Confirm the entry with Next

- Under Package Information specify the information to be displayed for the package when it is installed.
- Package name: The identifier of the application.
- Package display name: The name of the application that will be displayed to the user in the Start screen.
- Publisher name: This value will already be filled and read-only if you specified in the first step a certificate to use for signing the package.
- Publisher display name: The name of the publisher, which will be visible to the user.
- Version: The version number of the application. There isn’t any rule here, except that the last digit must always be zero and, as such, it won’t be editable. If you’re creating an update, remember that this value must be higher than the version of the previous package you generated.
- Installation location: This is dedicated to applications that don’t have an installer or that require some manual extra steps after the installation process. All the files you’re going to copy or modify inside this folder will be captured as part of the installation phase and included in the final package. This field is particularly important if you did not specify any installer in the first step. You can package a self-executable application by simply copying into this folder all the files that comprise it.
- Then click on Next

Note! If an msi file has been selected before, this information is read from the msi file and automatically stored here (here e.g. Microsoft Teams with Machine Wide Installer parameter). This can then be edited and personalized.

- In the following window the previously selected installer starts. Click through this as desired.

- The installation of the application is performed and recorded

- After installing the application, you can restart the system by clicking Restart if the application requires it. After this restart, the MSIX Packaging Tool is automatically started and can be continued at this point
- If the application does not require this, the process can be continued with Next

- Via Browse… you can add further entry points to the application

- A new window with the other possible entry points of the installed application follows. If, for example, the first point with uninstall.exe is selected here, the corresponding registry entries and files are added to the package
- If this is not desired, click on Next

- Confirm with a click on Yes, move on that the application is now completely installed and configured

- The recorded information is then evaluated

- The following Services report shows the installed services.
- By selecting the services, they can then be excluded from the package (Exclude selected services) or included (Include selected services)
- Then confirm the selection with Next

Note! Here is an example (Google Chrome was installed) of an application that also has services installed

- Under Create package the location for the MSIX file can be defined under Save location
- Using the Package editor, the data that flows into the MSIX package can be viewed and edited

- After clicking on Package editor you have four more tabs available
Package information – This section can be used to change the information displayed by the application, for example by changing the package name, publisher name, etc. If the package was not signed at build time, this can be done later. You can also check the contents of the XML manifest file by clicking the Open file button. You can then make changes manually and save them. The updated manifest file will be integrated into the package again.

Capabilities – This section lists all available functions that an application can access. However, many of the displayed functions are not allowed for Win32 applications, but are only valid for UWP applications. An exception is the Run as Administrator function, which can also be used by Win32 applications.
Virtual registry – In this area, you can examine the .dat files that store the various registry keys that were created during the deployment process. Because of the virtualized approach to registry provided by the MSIX container, these keys are not visible in the system registry when the application is installed. Therefore, it is important to make any necessary changes (adding or deleting entries) in this section. By right-clicking on the various entries in the tree structure, you can add, edit or delete keys and values.

Package files – Uses this panel to examine all files included in the package. As with the Virtual registry section, it can be helpful to remove files that are not needed or to add files that might be missing. Right-clicking any item in the tree gives you the option to delete it or add a new file in the same location.

- The package can be created at any time via Create
- Enter the name of the MSIX package and confirm this with Save


- After successful saving, the following message is displayed

Creating the App Attach Container
Of course, the following things can also be done manually if you do not want to install the Hyper-V feature. But I assume in the following that this is better done by script.
But for the following steps you also need the MSIX mgr tool.
- Download the tool – Download here

- Unpack the tool and copy the files under the bit version you need into a path of your choice (here C:\MSIX)

For the creation and configuration of the container I created a script. The script creates a VHD or VHDX file, mounts it, creates a partition and formats it. After that our parentFolder is created, the volume gets a reasonable name and the data from the MSIX package is copied over.

- Download the script and edit it with your parameters – Download here
In the 0-PreStage script, only the parameters have to be defined in the upper area and then the script will execute all necessary steps.
|
1 2 3 4 5 |
$vhdSrc="<path to vhd>" $packageName = "<package name>" $parentFolder = "<package parent folder>" $msixmgrPath = "<path to msixmgr.exe>" $msixPath = "<path to msix file>" |
Example:
|
1 2 3 4 5 |
$vhdSrc="\\dc01.deyda.local\msix$\VLC2.vhdx" $packageName = "VLC_1.2.3.0_x64__z09f9srqzta18" $parentFolder = "MSIX" $msixmgrPath = "C:\MSIX\msixmgr" $msixPath = "C:\MSIX" |
Explanation:
$vhdSrc – Target path where the container file (here a VHDX) should be stored
$packageName – Name of the package created via MSIX Packaging Tool
$parentFolder – Name of the folder to be created in the container. The MSIX files are not allowed to be stored directly in the root of the container. Of course the package name or similar can be placed here.
$msixmgrPath – Local path to the MSIX mgr tool
$msixPath – Local path to the MSIX package
- Start an administrative PowerShell

- Start the edited script to create the MSIX App Attach Container


- For the next script you need the information under UniqueId (here 9867f336-aca1-4bb9-8537-16c190388792) or you execute the command mountvol when the container is mounted. There you note the ID of the attached container (here drive E:)

The MSIX package contains the following files:
Assets – The graphic files of the application are stored in this folder

VFS – This folder usually contains the binary files of the application, DLLs, EXEs, configuration files and so on. The VFS and Asset folders are also referred to as the application’s user data.

Registry.dat – This file stores the application’s HKLM registry entries.
User.dat & User.Classes.dat – These files contain the registry entries per user
Resources.pri – This file contains application resources, such as localized strings and paths for additional resource files. The packages contain one file per language.
AppxManifest.xml – This XML file is the main resource of the package. It contains all the information the system needs to identify, install, and run the application.
AppxBlockMap.xml – This is an automatically generated file that contains a list of all binaries of the application and their hashes. It is used by the system for integrity checks and when performing differential updates.
AppxSignature.p7x – This file stores the digital signature information for the package contents.

PowerShell deployment scripts
At the moment you have to connect the MSIX App Attach Container to the target system via script. For this you need 4 scripts:
1-stage.ps1 – This is used to mount the MSIX Container to the target system

|
1 2 3 4 |
$vhdSrc="<path to vhd>" $packageName = "<package name>" $parentFolder = "<package parent folder>" $volumeGuid = "<vol guid>" |
Example:
|
1 2 3 4 |
$vhdSrc="\\dc01.deyda.local\msix$\VLC2.vhdx" $packageName = "VLC_1.2.3.0_x64__z09f9srqzta18" $parentFolder = "MSIX" $volumeGuid = "9867f336-aca1-4bb9-8537-16c190388792" |
Explanation:
$vhdSrc – Target path where the container file (here a VHDX) is stored
$packageName – Name of the package that is stored in the container
$parentFolder – Name of the folder that was created in the container
$volumeGuid – Volume ID of the disk

2-register.ps1 – This script registers the application of the mounted container in the user context

|
1 |
$packageName = "<package name>" |
Example:
|
1 |
$packageName = "VLC_1.2.3.0_x64__z09f9srqzta18" |
Explanation:
$packageName – Name of the package that is stored in the container
3-deregister.ps1 – This script is used to disconnect the application of the mounted container in the user context

|
1 |
$packageName = "<package name>" |
Example:
|
1 |
$packageName = "VLC_1.2.3.0_x64__z09f9srqzta18" |
Explanation:
$packageName – Name of the package that is stored in the container
4-destage.ps1 – Used to disconnect the container again

|
1 2 |
$packageName = "<package name>" $vhdSrc="<path to vhd>" |
Example:
|
1 2 |
$packageName = "VLC_1.2.3.0_x64__z09f9srqzta18" $vhdSrc="\\dc01.deyda.local\msix$\VLC2.vhdx" |
Explanation:
$packageName – Name of the package that is stored in the container
$vhdSrc – Target path where the container file (here a VHDX) is stored
Deployment via MSIX App Attach
The scripts you just created must now be executed for the respective user. This can be done, for example, by GPO or WEM actions. In my example I used GPOs for this.
- For this purpose create a GPO which contains the two scripts (1-Stage.ps1 & 2-Register.ps1) needed to mount the application and the permission to mount the containers (Perform volume maintenance tasks).

- Stores the scripts there under Logon, as PowerShell Scripts

- Now go to the path Computer Policy > Computer Configuration > Windows Settings > Security Settings > Local Policies > User Rights Assignment

- Now add a user group to the Perform volume maintenance tasks setting (here Domain Users).

- The same should be created again as Logoff script with the respective 3-Deregister.ps1 and 4-Destage.ps1 script.
Result
Before the scripts were activated, the image was empty.

When a user logs in after activating the GPOs, the scripts are executed and the user can use the application as if it were installed natively. Here at the start of a Windows 10 desktop via Citrix.


Here you can see the edited package name (Google Chrome MSIX).

Hey man, thanks for this. I’m trying to determine if app layering and elastic layers for this is better or should we forget that and start looking at app attach instead? Your opinion would be appreciated.
Hi Erkan, do you only want to separate single applications from the image or split the whole image (OS & Applications)? If only single applications from extra worker images should be moved to the central image, App Attach would be my preferred way, even if it only works on Windows 10 at the moment.
Hi Manuel, I haven’t begun any projects with app-layering yet, only messing with it in my labs. I’m going to take a look at app-attach in the coming days using your great guide. For me the utopia would be to split everything, Apps, OS and Profiles, e.g. App layering for OS and Apps and Fslogix for profile containers, but i find it’s getting very complicated as we have technologies doing the same thing almost. I’m not too fond of the idea of using app-masking from fslogix as it’s separation i’m after. So are you saying that you would use app-attach over elastic layers for single apps to reduce the number of worker images but if i’m trying to separate everything, go for App-Layering? I guess we can still use app-attach as well in this scenario.
Ah man, wrote a response and it didn’t get posted for some reason. Here goes again.
Thanks Manuel. So what you are saying is that you would prefer it for single apps over elastic layering to reduce the number of worker images hosting those single apps, got it. If i wanted to separate everything, would app-layering be the better choice? I supposed you could then use app-attach with this method also if you wanted to. I like the sound of app masking from FSLogix, but not so much the placing of everything on a base image if you have lots of apps as that could get messy down the line.
So for me app-layering seems to be the better choice for the separation scenario as you could keep your base OS layer clean. The only issue with app layering is that the layers are tied to the OS layer, whereas appattach can be used on other any Win10 system, so i guess that’s an advantage too.
Hi Erkan, at the moment I would still prefer AppLayering for the known reasons, because we can only use MSIX App Attach on Windows 10.
If this is solved and Windows Server is also supported, I would use AppLayering for OS and add the complete application via MSIX App Attach. For profiles I recommend FSlogix if the image should stay clean.
Great stuff, thanks for the advice Manuel and the time you take to produce these articles.
Manuel, Thanks for a great write-up 🙂 It’s been really useful as I start working with this.
Couple of very small observations:
1) When you’re creating the packaging machine, install the MSIX packaging tool first before disabling the Windows update and Content Delivery services. I couldn’t pull it down from the Store until I had re-enabled it. Once installed, then disable them.
2) Minor typo in linked copy of the pre-stage script from Github – the packagepath variable on Line 24 is missing the “\”, or it needs to be added to the msixpath variable on line 19. Told you it was minor 🙂
I am having a more serious issue though. The Stage script seems to need to be run with elevated rights, or else it can’t create the junction point. It mounts the volume OK but that’s only half the job that script does. If the junction point isn’t created, then although the folder seems to appear in c:\temp\appattach\packagename, you can’t do anything with it and the Register script doesn’t make the app appear. I have tried running it directly as a non-admin user (fails), running it from an elevated Powershell (success), and from GPO (fails).
Did you come across anything like this?
Hi Mike,
To 1: Yes I always use the installer, that’s why I didn’t find the error.
To 2: Yes you must add the \ to the msixpath.
Have you given your user the following permissions -> Perform volume maintenance tasks
Hi Manuel,
Yes, I set that user rights permission in gpedit.msc (and have also checked it’s not being overridden by domain policy). Looking more closely after running the script with PS ISE, I think the script does succeed with the VHD attach and the junction point (hence the folder appearing in c:\temp\AppAttach\packagename), but is failing at step three, ‘region stage’:
Id : 1600
Exception : System.AggregateException: One or more errors occurred. —> System.UnauthorizedAccessException: Access is denied.
Access is denied.
— End of inner exception stack trace —
—> (Inner Exception #0) System.UnauthorizedAccessException: Access is denied.
Access is denied.
<—
Status : Faulted
IsCanceled : False
IsCompleted : True
CreationOptions : None
AsyncState :
IsFaulted : True
AsyncWaitHandle : System.Threading.ManualResetEvent
CompletedSynchronously : False
I guess the script itself must be OK, or it wouldn't work as admin either, so there must be something missing from my user permissions.
Hi, great article that I’ve followed for deploying MSIX App Attach with our Citrix VADs installation built on Win10 20H2 🙂
Majority of apps are working fine but I’ve a query though on apps that have services as part of them, eg Chrome, Adobe Reader, that as our users are standard users in the environment and they have issues registering the apps due to permissions – Are there any ways around this?
Thanks
Hello,
I am trying to create new-vhd, but I am getting following error message:
new-vhd : Failed to create the virtual hard disk.
The system failed to create ‘\\xxx\MSIX\vlc.vhdx’.
Failed to create the virtual hard disk.
The system failed to create ‘\\xxx\MSIX\vlc.vhdx’: General access denied error (0x80070005).
Do you have any idea why is this happening?
Thank you
Tomas
Hi,
when I am doing the second phase – register, I will always get following error
Add-AppxPackage : Deployment failed with HRESULT: 0x80073CFF, K instalaci této aplikace potřebujete vývojářskou licenci pro Windows nebo systém s povoleným zkušebním nač
ítáním aplikací (sideload).
Deployment of package Firefox_1.0.0.0_x64__zgke8crrmjz2e with package origin Unsigned failed because no valid license or sideloading policy could be applied. A developer
license (http://go.microsoft.com/fwlink/?LinkId=233074) or enterprise sideloading configuration (http://go.microsoft.com/fwlink/?LinkId=231020) may be required.
NOTE: For additional information, look for [ActivityId] e03c0518-0c46-0001-cc59-3fe0460cd801 in the Event Log or use the command line Get-AppPackageLog -ActivityID e03c0
518-0c46-0001-cc59-3fe0460cd801
I enabled developer mode and enabled running applications from all locations, but without any effect
Thank you
I am trying to do MSIX App attach on Windows 10, regarding this article: http://www.deyda.net/index.php/en/2020/06/16/msix-app-attach-with-windows-10-version-2004-in-citrix…
but every time, when I am trying to register package I am getting the following error, without any idea why…
Add-AppxPackage : Deployment failed with HRESULT: 0x80073CF6, cannot register package.error 0x80070003: While preparing to process the request, the system failed to register the windows.comInterface extension due to the following error: Cannot find the path.
Does anyone have any experience with that? Thank you very much
hi there , any tips on how you can rollout for multiple applications via app attach ?