

Table of Contents
Current version is Workspace Environment Management 2206.

In the following I will give an insight into the menu items System Optimization, Policies & Profiles and Security.

System Optimization
These settings are used to reduce resource usage on the host. They are used to free up resources and make them available for other applications, thereby increasing the user density per host.
While the System Optimization settings are machine-based and apply to all user sessions of a machine, the Process Optimization under CPU Management is user-based.
That is, when a process triggers CPU Spike Protection in user A’s session, the event is recorded and limited for user A only. When user B starts the same process, the behavior of process optimization is determined only by process triggers in user B’s session.

All settings under System Optimization must be confirmed with Apply on the respective tab.

CPU Management
Processes can run across all available cores on a machine and can use as much CPU as the individual process wants.
In Workspace Environment Management this can be limited using the CPU Management settings.

! Important !
The CPU assignment in the following settings is based on the logical processors in the physical or virtual machine. Each core of a CPU is considered a logical processor, just as Windows does. For example, a physical machine with a 12 core CPU is considered to have 24 logical processors (because of Hyper Threading). A physical machine with 4 x CPUs with 12 cores each has 48 logical processors. A VM configured with two 8 core CPUs has 16 logical processors.
The total number of logical processors depends on the number of CPUs, the number of cores in the CPU and whether Hyper Threading is enabled. The simplest method to determine the total number of logical cores in a computer is to use the Windows Task Manager (e.g. 2 logical processors in the picture):

CPU Management Settings
When CPU Spike Protection is enabled and a process reaches a certain threshold (exceeding the average load over a certain time), WEM automatically lowers the priority of the process for a certain time. Then, when a new application is started, it has a higher priority than the lower priority process, and the system continues to run smoothly.
! Important !
The process is not hard limited like in CPU Clamping, instead only his priority is reduced.
- Enable CPU Spike Protection
- Lowers the CPU priority of processes for a certain time (Idle Priority Time), if it exceeds the specified percentage of CPU utilization (CPU Usage Limit) for a certain time (Limit Sample Time)
- If several individual processes together exceed the specified threshold, CPU Spike Protection is not activated, it is only activated when a single process instance of a user exceeds the threshold value
- CPU Spike Protection is not designed to reduce overall CPU utilization, but is intended to reduce the impact on the user experience from processes that consume an excessive percentage of CPU utilization
- Auto Prevent CPU Spikes
- This option automatically reduces the CPU priority of processes that overload the CPUs
- It automatically calculates the threshold at which CPU Spike Protection is triggered, based on the number of logical processors
- Example:
The system has 4 CPU cores
When the total CPU utilization exceeds 23%, the CPU priority of processes that consume more than 15% of the total CPU resources is automatically reduced
The system has 8 CPU cores
When the total CPU utilization exceeds 11%, the CPU priority of processes that consume more than 8% of CPU resources is automatically reduced
- Customize CPU Spike Protection
- Allows to adjust the settings for the CPU Spike Protection
- CPU Usage Limit (%)
- The percentage of CPU utilization that a process instance must reach to trigger CPU Spike Protection
- This limit value applies globally for all logical processors of the server and is checked process-related
- For multiple instances of the same process, the percentage of their CPU usage is not added when determining the CPU Spike Protection triggers
- The basic rule for calculating the value is to take 100%, divide it by the number of CPUs and subtract 1. This prevents a single process from completely utilizing a CPU
- Example:
CPU Usage Limit = ( 100% / <NumCPUs> ) – 1
For a 4 Core Worker:
( 100% / 4 ) – 1 = 24%
For a 2 Core Worker:
( 100% / 2 ) – 1 = 49%
- Limit Sample Time (s)
- Determines how long a process can exceed the CPU Usage Limit in seconds before the priority is lowered
- Idle Priority Time (s)
- Defines the time in seconds for which a process priority is lowered before it returns to its previous priority
- The priority to which the process returns depends on the other options (Enable Intelligent CPU Optimization or CPU Priority)
- Enable CPU Core Usage Limit
- When activated, the process is not only lowered in priority by the CPU Spike Protection, but it is also only allowed to use the specified number of logical processors on the computer for the time (Idle Priority Time) of the protection
- Limit CPU Core Usage
- Defines the number of logical processors to which processes that trigger CPU Spike Protection are limited
- If a value is entered that is greater than the number of CPU cores, all available cores are used.
- In virtual environments, only the cores that are also assigned to the respective VM can be restricted here, not those of the underlying hypervisor
- Enable Intelligent CPU Optimization
- All processes that the user starts in his session are started with a CPU priority High (unless the process has already been conspicuous for this user)
- When this feature is enabled, the agent intelligently optimizes the CPU priority of processes that trigger CPU Spike Protection
- Processes that repeatedly trigger CPU Spike Protection are assigned a lower CPU priority at the next startup than processes that behave correctly
- Whenever a process triggers CPU Spike Protection, the event is recorded in the agent’s local database (For each user separately)
- Example:
When User 1 starts Internet Explorer for the first time, WEM will initially assign the priority High to User 1’s iexplore process.
If Internet Explorer repeatedly triggers CPU Spike Protection, WEM will run the process with the next lower CPU priority, e.g. Above Normal, the next time the user starts it.
If the process continues to trigger CPU Spike Protection, it is started with the next lower priority until it finally starts with the lowest priority.
- Enable Intelligent IO Optimization
- This works the same way as CPU Optimization, but for I/O (Lowering the priority after triggering CPU Spike Protection)

- Exclude specified processes
- Allows to exclude certain processes from CPU Spike Protection.
- CPU Management excludes most common Citrix and Windows Core processes by default
- The process name is entered as it is found in the Task Manager, but without the extension (explorer instead of explorer.exe)
- When a process is regulated by CPU Spike Protection, WEM generates an entry under Application and Service Logs / Norskale Agent Service indicating the affected process
- WEM automatically excludes the following system processes and does not perform CPU optimization:
| Process Name |
|---|
| audiodg |
| csrss |
| LSASS |
| mscorsvw |
| MsMpEng |
| NisSrv |
| services |
| Svchost |
| System |
| System Idle Process |
| Taskmgr |
| vmwareresolutionset |
| Wininit |
CPU Priority
On the CPU Priority tab, processes can be specified and assigned a base priority. This allows the process to consume more or less CPU time. Assigning a process the priority Realtime is not recommended.
If you assign Normal priority to a process, for example, explorer.exe, the process starts at that priority level and never drops to a lower priority, but it can run at a higher priority.
! Important !
This defined base priority can also not be reduced via the CPU Spike Protection!
- Enable Process Priority
- Only when this is selected, CPU priorities for processes can be set manually

In the Add Process CPU Priority window, accessible via Add, the process name and the base priority can be defined.
Existing processes can be edited via Edit and deleted via Remove.

- Process Name
- Defines the process whose base priority is to be set
- CPU Priority
- Defines the base priority for the process

! Important !
Realtime should not be defined. This can lead to malfunctions in the system.
CPU Affinity
On the CPU Affinity tab, the maximum usable CPU cores for a process can be defined.
This can be used to ensure that a certain process does not permanently block all logical processors, but only the number defined here (in the picture, Internet Explorer can only use a maximum of 2 Cpu cores).
- Enable Process Affinity
- Only if this is selected, CPU core numbers for processes can be stored

In the New Process Affinity window, accessible via Add, the process name and the number of logical processors can be defined.
Existing processes can be edited via Edit and deleted via Remove.
- Process Name
- Defines the process to limit
- Desired Affinity
- Defines the maximum number of cores that can be used for this process

CPU Clamping
CPU Clamping prevents processes from consuming more than a previously configurable percentage of power of the total CPU. WEM throttles the process when the specified CPU % is reached. This can be a hard way to prevent individual processes from consuming large amounts of CPU and thus crippling the host.
To keep the CPU utilization of a problematic process low, it is still recommended to use CPU Spike Protection, CPU Priority or CPU Affinity.
CPU Clamping should only be used in extreme emergencies, e.g. for the control of processes which are known to be poorly controlled by resource management.
The previously configured percentage of clamping refers to the total performance of all CPUs in the server, not to a single core contained within it. (In other words, 10% of a Quad Core CPU is 10% of the total CPU, not 10% of a core).
- Enable Process Clamping
- Only when this is selected can the throttling for processes be stored

In the New Clamped Process window, accessible via Add, the process name and the CPU limit value in percent can be defined.
Via Edit existing processes can be edited and via Remove deleted.
- Process Name to Clamp
- Defines the process to limit
- Clamping Percentage
- Defines the limit in percent (total over all cores) that the process can use at maximum

Memory Management
When these settings are enabled, WEM calculates how much memory a process uses and the minimum amount of memory a process needs without losing stability. WEM considers the difference as excess memory. When the process becomes inactive, WEM releases the excess memory that the process consumes to the page file and optimizes the process for subsequent starts. Normally, an application becomes inactive when it is minimized to the taskbar.
When applications are restored from the taskbar, they initially run in their optimized state, but may continue to consume additional memory as needed.
An example of this memory optimization is when a user opens Microsoft Edge and browses multiple websites. During this time, Memory Management calculates the amount of RAM used plus the least amount of RAM required for the Edge processes. When the user minimizes Microsoft Edge to the taskbar and the percentage CPU of the Edge processes drops to the value set for Idle State Limit, WEM forces the process to release the previously calculated excess RAM. The RAM is released by writing it to the page file.
Similarly, WEM optimizes all applications that users use during their desktop sessions. When there are multiple processes across multiple user sessions, all freed memory is available for other processes. This behavior increases user density by supporting a larger number of users on the same server.

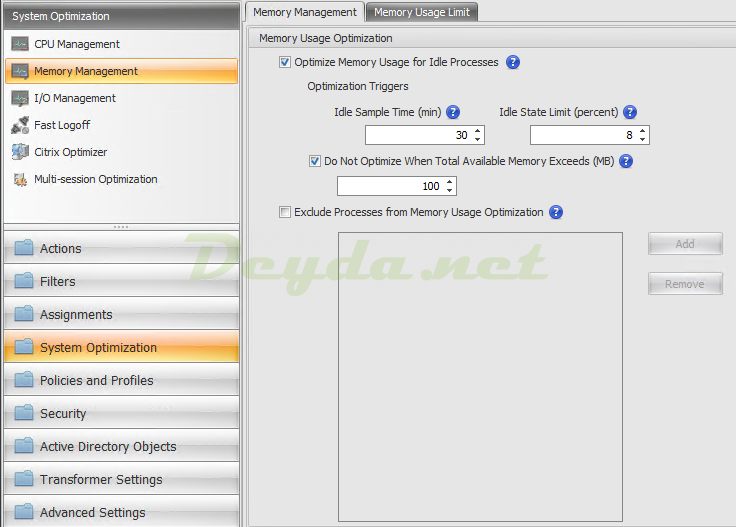
Memory Management
- Optimize Memory Usage for Idle Processes
- Forces processes that remain idle for a certain time to release excess memory until they are no longer idle
- Idle Sample Time (min)
- Definition of the time period after which a process is considered inactive and is forced to release excess memory
- During this time WEM calculates how much memory a process consumes and how much memory a process needs at least without losing its stability
- The default value is 120 minutes (recommendation here is a value between 30-60)
- Idle State Limit (percent)
- Defines to specify the percentage of CPU utilization below which a process is considered inactive
- The default value is 1% (recommendation is 3%)
- Recommendation is not to use a higher value than 5%, otherwise actively used processes are wrongly considered idle and memory is released
- Do Not Optimize When Total Available Memory Exceeds (MB)
- Allows you to set a threshold below which WEM will only start memory optimization
- Exclude Processes from Memory Usage Optimization
- Allows to exclude certain processes from memory optimization
- The process name is entered as it is found in the Task Manager, but without the extension (explorer instead of explorer.exe)
- WEM automatically excludes the following system processes and does not perform memory optimization:
| Prozess Name |
|---|
| audiodg |
| csrss |
| dllhost |
| LSASS |
| Memory Compression |
| mscorsvw |
| msdtc |
| msiexec |
| MsMpEng |
| NisSrv |
| rdpclip |
| rdpshell |
| services |
| smss |
| spoolsv |
| Svchost |
| System |
| System Idle Process |
| taskmgr |
| wfshell |
| winlogon |
| wininit |
| wmiprvse |

Memory Usage Limit
With Memory Usage Limit individual processes can be limited regarding their memory consumption. Similar to the CPU Clamping procedure described above.
! Important !
Applying Memory Usage Limit to certain processes can have unintended consequences, such as slower system response time.
- Enable Memory Usage Limit for Specific Processes
- Only when this is selected can limits for processes be stored

In the Add Process window, accessible via Add, a process can be defined.
Via Edit existing processes can be edited and via Remove deleted. If you select an existing process, you can use the Dynamic Limit and Static Limit buttons to change this option for the selected process.

- Process Name
- Defines the process to limit
- Memory Usage Limit (MB)
- Definition of the limit in MB for the process
- Dynamic Limit
- This setting dynamically limits the amount of allocated memory for the specified process
- It enforces the limit for memory usage depending on the available memory of the system
- Therefore, the memory consumed by the specified process may exceed the specified amount
- Static Limit
- This setting statically limits the amount of memory allocated (Hard Limit)
- The process is prevented from consuming more than the specified amount of memory, regardless of the amount of memory available to the system
- The memory consumed by the specified process is always limited to the specified amount

I/O Management
I/O Priority can be used to define the base priority of certain processes so that processes competing for access to disk and network I/O do not cause performance bottlenecks. For example, the I/O Management setting can be used to throttle an application that requires a lot of disk bandwidth.
The actual or current priority of a thread can be higher (but is never lower than the base priority). In general, Windows grants access to the higher priority threads before the lower priority threads.
- Enable Process I/O Priority
- Only when this is selected can priorities be stored for processes

In the Add Process I/O Priority window, accessible via Add, a process can be defined.
Via Edit existing processes can be edited and via Remove deleted.
- Process Name
- Defines the process
- I/O Priority
- Defines the base priority for the process

Fast Logoff
Fast Logoff immediately terminates the HDX connection to a remote session, giving users the impression that the session has been logged off more quickly. However, the session itself continues in the background on the VDA through the session logoff phases.
- Enable Fast Logoff
- Enables Fast Logoff for all users in this configuration set
- Exclude Specific Groups
- Allows to exclude certain user groups from Fast Logoff
- This is needed if certain programs do not support the abrupt disconnect

Citrix Optimizer
Citrix Optimizer optimizes user environments for better performance. It performs a quick scan of user environments and then applies template-based optimization recommendations.
For non-persistent workers, I would normally recommend intercepting this part via BIS-F, since this already optimizes the Golden Master. This means that all workers resulting from this are directly optimized.
- Enable Citrix Optimizer
- Controls if the Citrix Optimizer is enabled
- Run Weekly
- If selected, WEM performs optimizations on a weekly basis
- If not selected, WEM will behave as follows:
- When a template is added to WEM for the first time, WEM performs the appropriate optimization
- WEM performs the optimization only once, unless changes are made to the template later, in which case it is applied again
- Automatically Select Templates to Use
- When this is selected, WEM chooses which template to use (based on the operating system)
- Enable Automatic Selection of Templates Starting with Prefixes
- With this option user-defined templates with different name formats can be defined
- Multiple prefixes can be stored comma separated
- The custom templates follow these name formats:
prefix_<os version>_<os build>
prefix_Server_<os version>_<os build>

In the New Custom Template window, accessible via Add, a custom template can be created.
You can take a closer look at the selected template via Preview.

Via Edit existing templates can be edited and via Remove user-defined templates can be deleted.

- Template Name
- The display name of the template
- Browse
- Open an existing template for customization
- Existing templates can be found at the following locations:
- Download the Citrix Optimizer and copy the existing templates there to upload them to WEM
- Copies from a worker on which the WEM Agent is installed (C:\Program Files (x86)\Citrix\Workspace Environment Management Agent\Citrix Optimizer\Templates) the required standard templates
- Applicable OSs
- A list of operating systems for which this template should apply
- Custom templates for additional Windows 10 operating systems not included in the list can be entered via the field
- For this purpose the build number must be stored there semicolon separated (e.g. 2001;2004)
- Groups
- The Available area displays a list of the grouped optimization entries
- Double click on a group or click on the arrow buttons moves this group to Configured and thus this group would be applied in this template
- State
- Status of the object (Enabled / Disabled)
- If Disabled, the template will not be processed by the agent and WEM will not perform any optimizations associated with the template

Multi-session Optimization
Multi-session operating systems run multiple sessions from a single machine to deliver applications and desktops to users. A disconnected session remains active and its applications continue to run.
The disconnected session can consume resources needed for connected desktops and applications running on the same computer. These settings can be used to optimize operating systems with multiple sessions and disconnected sessions to improve the user experience with connected sessions.
- Enable Multi-session Optimization
- This option improves the user experience of connected sessions by limiting the number of resources that can be consumed by disconnected sessions
- After a session has been disconnected for one minute, the WEM Agent lowers the CPU and I/O priorities of the processes and applications connected to the session
- The agent then sets limits on the memory resources that the session can consume
- When the user reconnects to the session, WEM restores the priorities and removes the restrictions
- Exclude Specified Groups
- Here you can define groups that should be excluded from the multi-session optimization
- If activated, at least one group must be stored
- Exclude Specified Processes
- Here processes can be excluded from the multi-session optimization
- This may be necessary if processes do not want to continue functioning normally after resuming the session
- If activated at least one name of a process must be stored

Policies and Profiles
The following settings can be used to customize user environments and configure user profiles. This replaces several normally existing default GPO settings and therefore speeds up the login process.

All settings must be confirmed with Apply on the respective tab.

Environmental Settings
These options change the user’s Environmental Settings. Some of the options are processed only at login, while others can also be updated in the session, with the Agent Refresh.

Start Menu
These options change the Start Menu and the appearance of the taskbar, as well as the user’s desktop background.
- Process Environmental Settings
- Activates the processing of the Environmental Settings
- Exclude Administrators
- If enabled, Environmental Settings for administrators are not processed even if the agent is started
- Hide Common Programs
- Keeps the Start menu free of default icons from the All Users profile
- Remove Run from Start Menu
- Removes the Run menu item from the Start menu
- Hide Administrative Tools
- Removes Administrative Tools from Start menu
- Hide Help
- Removes Help from the Start menu
- Hide Find
- Removes search from the Start menu
- Hide Windows Update
- Removes the Windows Update menu item from the Start menu
- Lock Taskbar
- Sperrt die Tasbar für alle Benutzer
- Hide System Clock
- Hides the clock from the taskbar
- Hide Devices and Printers
- Removes the Devices and Printers menu item from the Start menu
- Hide Turn Off Computer
- Removes Turn off computer from Start menu
- Force Logoff Button
- In the On / Off menu, sets the Logout option as the default action
- Turn Off Notification Area Cleanup
- The taskbar notification area will not hide any notifications and show all of them
- Turn Off Personalized Menus
- Hides the Personalized Menus, which are pinned to the top of the Start menu and contain the most recently used items
- Clear Recent Programs List
- Deletes the history of the last opened documents when logging out
! Important !
On operating systems other than Windows 7, the options under User Interface: Start Menu may not work, except for Hide System Clock and Hide Turn Off Computer.
- Set Specific Theme File
- Defines the theme file to use
- Path to the resource must be entered from the user’s point of view
- Works only for fresh profiles, for already set up profiles this does nothing
- Set Background Color
- Defines the background color
- Works only for fresh profiles, for already set up profiles this does nothing
- Set Specific Visual Style
- Defines the visual style file to be used
- Path to the resource must be entered from the user’s point of view
- Works only for fresh profiles, for already set up profiles this does nothing
- Set Wallpaper
- Defines the background image to use
- Path to the resource must be entered from the user’s point of view
- Works only for fresh profiles, for already set up profiles this does nothing

Desktop
Desktop can be used to control which desktop objects and properties should be modified by the WEM Agent.
- Hide My Computer Icon
- Hides My Computer icon from the desktop
- Hide My Recycle Bin Icon
- Hides the recycle bin on the desktop
- Hide My Documents Icon
- The My Documents icon is hidden
- Go to Desktop instead of Start
- The desktop is displayed at session start and not the start menu

- Disable System Properties
- The system settings are no longer accessible via My Computer
- Disable Recycle Bin Properties
- The recycle bin settings are no longer accessible
- Disable My Documents Properties
- My Documents settings are hidden
- Hide Network Icon
- The My Network Places icon is hidden
- Hide Network Connections
- Network Connections are not displayed
- Disable Task Manager
- The Task Manager will not be accessible for the user session
Via User Interface: Edge UI, aspects of the Windows 8.x Edge user interface can be disabled. Since this is no longer particularly up-to-date, I won’t go into further detail here.

Windows Explorer
Windows Explorer is used to control various aspects of the Explorer, such as preventing Regedit and Cmd from being accessed.
! Important !
Be careful with the Disable Silent Regedit and Disable Cmd Scripts options. This also prevents logon scripts and registry hacks from being executed outside of WEM.
- Prevent Access to Registry Editing Tools
- Regedit is not accessible for the user
- Disable Silent Regedit
- Regedit is also no longer accessible for the system
- Prevent Access to Command Prompt
- CMD is not callable for the user
- Disable Cmd Scripts
- CMD is also no longer callable for the system
- Remove Context Menu Manage Item
- Removes the Manage context menu item from This PC
- Remove Network Context Menu Items
- Hides the context menu items for Network
- Hide Libraries in Explorer
- The item Libaries is removed from the Explorer
- Hide Network Icon in Explorer
- The Network icon is completely hidden in Explorer
- Hide Programs Control Panel
- Hides programs from control panel
- Disable Windows Security
- Windows Security is not accessible for the user
- Disable Explorer Context Menu
- Explorer context menu is not available
- Disable Taskbar Context Menu
- The Taskbar context menu is hidden
- Hide Specified Drives
- The listed drives are hidden in the user’s workspace
- They are still accessible when navigating directly to them
- Restrict Specified Drives
- The listed drives are hidden and locked
- Neither the user nor his applications can access the drive

Control Panel
Control Panel is used to customize and limit the system control for the users. Here, individual applets can be hidden or shown.
- Hide Control Panel
- Hides the complete control panel
- Show only specified Control Panel Applets
- All control panel applets except the ones listed here are hidden from the user
- The applets must be added with their canonical name
- Hide specified Control Panel Applets
- Only the listed control panel applets are hidden
- Additional applets can be added using their canonical name

Use Show / Hide only specified Control Panel Applets to define the control panel elements that will be hidden/shown to the user.
List of commonly used canonical names:
| Applet Name | Canonical Name |
| Action Center | Microsoft.ActionCenter |
| Administrative Tools | Microsoft.AdministrativeTools |
| AutoPlay | Microsoft.AutoPlay |
| Biometric Devices | Microsoft.BiometricDevices |
| BitLocker Drive Encryption | Microsoft.BitLockerDriveEncryption |
| Color Management | Microsoft.ColorManagement |
| Credential Manager | Microsoft.CredentialManager |
| Date and Time | Microsoft.DateAndTime |
| Default Programs | Microsoft.DefaultPrograms |
| Device Manager | Microsoft.DeviceManager |
| Devices and Printers | Microsoft.DevicesAndPrinters |
| Display | Microsoft.Display |
| Ease of Access Center | Microsoft.EaseOfAccessCenter |
| Family Safety | Microsoft.ParentalControls |
| File History | Microsoft.FileHistory |
| Folder Options | Microsoft.FolderOptions |
| Fonts | Microsoft.Fonts |
| HomeGroup | Microsoft.HomeGroup |
| Indexing Options | Microsoft.IndexingOptions |
| Infrared | Microsoft.Infrared |
| Internet Options | Microsoft.InternetOptions |
| iSCSI Initiator | Microsoft.iSCSIInitiator |
| iSNS Server | Microsoft.iSNSServer |
| Keyboard | Microsoft.Keyboard |
| Language | Microsoft.Language |
| Location Settings | Microsoft.LocationSettings |
| Mail (Microsoft Outlook 2016) (For M365 Apps) | |
| Mouse | Microsoft.Mouse |
| MPIOConfiguration | Microsoft.MPIOConfiguration |
| Network and Sharing Center | Microsoft.NetworkAndSharingCenter |
| Notification Area Icons | Microsoft.NotificationAreaIcons |
| Pen and Touch | Microsoft.PenAndTouch |
| Personalization | Microsoft.Personalization |
| Phone and Modem | Microsoft.PhoneAndModem |
| Power Options | Microsoft.PowerOptions |
| Programs and Features | Microsoft.ProgramsAndFeatures |
| Recovery | Microsoft.Recovery |
| Region | Microsoft.RegionAndLanguage |
| RemoteApp and Desktop Connections | Microsoft.RemoteAppAndDesktopConnections |
| Sound | Microsoft.Sound |
| Speech Recognition | Microsoft.SpeechRecognition |
| Storage Spaces | Microsoft.StorageSpaces |
| Sync Center | Microsoft.SyncCenter |
| System | Microsoft.System |
| Tablet PC Settings | Microsoft.TabletPCSettings |
| Taskbar and Navigation | Microsoft.Taskbar |
| Troubleshooting | Microsoft.Troubleshooting |
| TSAppInstall | Microsoft.TSAppInstall |
| User Accounts | Microsoft.UserAccounts |
| Windows Anytime Upgrade | Microsoft.WindowsAnytimeUpgrade |
| Windows Defender | Microsoft.WindowsDefender |
| Windows Firewall | Microsoft.WindowsFirewall |
| Windows Mobility Center | Microsoft.MobilityCenter |
| Windows To Go | Microsoft.PortableWorkspaceCreator |
| Windows Update | Microsoft.WindowsUpdate |
| Work Folders | Microsoft.WorkFolders |
! Important !
With the system control element Mail it is to be noted that it depends on the operating system and the Outlook version. Here simply check on the target system in advance, as it is deposited there.

Known Folders Management
Known Folders Management can be used to prevent the specified folders from being created when the user profile is created.
! Important !
This does not work with existing profiles!
- Disable Specified Known Folders
- The listed folders are not created

List of Known Folders:
| Known Folder Name | Path |
| 3D Objects | %USERPROFILE%\3D Objects |
| Account Pictures | %APPDATA%\Microsoft\Windows\AccountPictures |
| Administrative Tools | %APPDATA%\Microsoft\Windows\Start Menu\Programs\Administrative Tools %ALLUSERSPROFILE%\Microsoft\Windows\Start Menu\Programs\Administrative Tools |
| Camera Roll | %USERPROFILE%\OneDrive\Pictures\Camera Roll %USERPROFILE%\Pictures\Camera Roll |
| Contacts | %USERPROFILE%\Contacts |
| Desktop | %USERPROFILE%\Desktop |
| Documents | %USERPROFILE%\OneDrive\Documents %USERPROFILE%\Documents |
| Downloads | %HOMEDRIVE%%HOMEPATH%\Downloads %USERPROFILE%\Downloads |
| Favorites | %USERPROFILE%\Favorites |
| Gadgets | %LOCALAPPDATA%\Microsoft\Windows Sidebar\Gadgets |
| GameExplorer | %LOCALAPPDATA%\Microsoft\Windows\GameExplorer |
| History | %LOCALAPPDATA%\Microsoft\Windows\History |
| ImplicitAppShortcuts | %APPDATA%\Microsoft\Internet Explorer\Quick Launch\User Pinned\ImplicitAppShortcuts |
| Libraries | %APPDATA%\Microsoft\Windows\Libraries |
| Links | %USERPROFILE%\Links |
| Local | %USERPROFILE%\AppData\Local |
| LocalLow | %USERPROFILE%\AppData\LocalLow |
| Music | %USERPROFILE%\Music |
| Network Shortcuts | %APPDATA%\Microsoft\Windows\Network Shortcuts |
| OneDrive | %USERPROFILE%\OneDrive |
| Pictures | %USERPROFILE%\OneDrive\Pictures %USERPROFILE%\Pictures |
| Printer Shortcuts | %APPDATA%\Microsoft\Windows\Printer Shortcuts |
| Programs | %LOCALAPPDATA%\Programs |
| Quick Launch | %APPDATA%\Microsoft\Internet Explorer\Quick Launch |
| Recent Items | %APPDATA%\Microsoft\Windows\Recent |
| Ringtones | %LOCALAPPDATA%\Microsoft\Windows\Ringtones |
| Roaming | %APPDATA% %USERPROFILE%\AppData\Roaming |
| RoamingTiles | %LOCALAPPDATA%\Microsoft\Windows\RoamingTiles |
| Saved Games | %USERPROFILE%\Saved Games |
| Saved Pictures | %USERPROFILE%\Pictures\Saved Pictures |
| Screenshots | %USERPROFILE%\Pictures\Screenshots |
| Searches | %USERPROFILE%\Searches |
| SendTo | %APPDATA%\Microsoft\Windows\SendTo |
| Start Menu | %APPDATA%\Microsoft\Windows\Start Menu |
| StartUp | %APPDATA%\Microsoft\Windows\Start Menu\Programs\StartUp |
| Templates | %APPDATA%\Microsoft\Windows\Templates |
| User Pinned | %APPDATA%\Microsoft\Internet Explorer\Quick Launch\User Pinned |
| Videos | %USERPROFILE%\Videos |
SBC/ HVD Tuning
With SBC / HVD Tuning (Session-Based Computing / Hosted Virtual Desktop), various options can be enabled to optimize performance when using session hosts such as Virtual Apps or SharedDesktops. Some of the options are for performance enhancement, but may affect the user experience somewhat.
- Disable Drag Full Windows
- Disables the display of the window contents when dragging to a position
- Disable SmoothScroll
- Disables the effect of smooth scrolling when browsing pages
- Disable Cursor Blink
- Disables the cursor blink
- Disable MinAnimate
- Turns off the animation effect when minimizing or maximizing windows
- Enable AutoEndTasks
- Automatically kills tasks after they have reached the timeout (WaitToKillApp Timeout)
- WaitToKillApp Timeout
- Definition of the timeout value (in milliseconds) for the termination of the tasks
- The default value is 20,000 milliseconds
- Set Cursor Blink Rate
- Changes the cursor blink speed
- Set Menu Show Delay
- Specifies a delay (in milliseconds) before the menu appears after login
- Set Interactive Delay
- Specifies a delay (in milliseconds) before a submenu appears after a click

Microsoft USV Settings
With Microsoft USV Settings (User State Virtualization), WEM can be used to configure Microsoft Roaming Profile and Folder Redirection.

Roaming Profiles Configuration
With these settings, Microsoft Roaming Profiles can be configured via Workspace Environment Management.
- Process User State Virtualization Configuration
- Controls whether the agent processes USV settings
- Exclude Administrators
- If enabled, USV settings for administrators are not processed even if the agent is started
- Set Windows Roaming Profiles Path
- The path to the Windows profile folder
- Set RDS Roaming Profiles Path
- The path to the RDS profile folder
- Set RDS Home Drive Path
- The path to the RDS home drive and the drive letter with which it should appear in the user environment

Roaming Profiles Advanced Configuration
Herewith advanced options for the optimization of the roaming profile can be stored.
- Enable Folders Exclusions
- The listed folders are not included in the users’ roaming profile
- This way, certain folders can be excluded that are known to contain large amounts of data that the user does not need as part of their roaming profile
- The list is pre-populated with default exclusions for Windows 7 / 2008 R2 (Windows 7 / 2008R2 Default Exclusions) and can be populated with default exclusions for Windows XP / 2003 instead (Windows XP / 2003 Default Exclusions)
- Delete Cached Copies
- The agent deletes cached copies of the roaming profiles
- Add the Administrators Security Group to Roaming User Profiles
- The Administrators group is added as an owner to roaming user profiles
- Do Not Check for User Ownership of Roaming Profile Folders
- WEM Agent does not check whether the user is the owner of the folder with the roaming profile before copying the data
- Do Not Detect Slow Network Connections
- Detection of the connection speed is skipped
- Wait for Remote User Profile
- The agent waits until the remote user’s profile is completely downloaded before processing its settings

Profile Cleansing
The Profile Cleansing button opens a wizard that can be used to clean up existing profiles based on the Folder Exclusion settings.

- Scan Profiles Folder
- Searches the specified folder with the specified recursion settings to find user profiles, and then displays all found profiles


- Cleanse Profile(s)
- This button cleans the selected profiles according to the folder exclusion settings

- Manage Filters
- Here are the current folders Exclusion listed and can also be customized or extended

Folder Redirection
Via the two tabs Folder Redirection can be defined via WEM and configured, for example, whether and where the user’s folders are redirected.
- Process Folder Redirection Configuration
- Enabled, the agent can process the folder redirection defined in WEM
- Redirect Desktop
- Specifying the path where the user’s desktop should be redirected to
- Redirect Documents
- Specifying the path where the user’s Documents folder should be redirected to
- Redirect Pictures
- Specifying the path where the user’s Pictures folder should be redirected to
- Pictures Follow Documents
- If activated, the Pictures folder will be redirected to the specified Documents folder
- Redirect Music
- Specifying the path where the user’s Music folder should be redirected to
- Music Follow Documents
- If activated, the Music folder will be redirected to the specified Documents folder
- Redirect Videos
- Specifying the path where the user’s videos folder should be redirected to
- Videos Follow Documents
- If enabled, the Videos folder will be redirected to the specified Documents folder

- Redirect Start Menu
- Specification of the path where the user’s start menu should be redirected to
- Redirect Favorites
- Specifying the path where the user’s Favorites folder should be redirected to
- Redirect AppData (Roaming)
- Specifying the path where the roaming part of the user’s AppData folder should be redirected to
- However, this is not recommended and can lead to various issues in modern operating systems
- Redirect Contacts
- Specifying the path where the user’s Contacts folder should be redirected to
- Redirect Downloads
- Specifying the path where the user’s Downloads folder should be redirected to
- Redirect Links
- Specifying the path where the user’s links folder should be redirected to
- Redirect Searches
- Specifying the path where the user’s Searches folder should be redirected to
- Delete Local Redirected Folders
- If enabled, the agent deletes the local copies of the folders selected for redirection

Citrix Profile Management Settings
Workspace Environment Management supports the functions and operation of the current version of Citrix Profile Management. Therefore, all settings for the current version of Citrix Profile Management can be stored here.

WEM is another method of configuring Citrix Profile Management, in addition to Active Directory GPOs, Citrix Studio Policies, or the .ini files on the VDA.
Main Citrix Profile Management Settings
These settings control the most important parameters of Citrix Profile Management.
- Enable Profile Management Configuration
- Controls whether the WEM Agent processes Citrix Profile Management settings from the Administration Console
- Enable Profile Management
- If enabled, the agent can process the settings in the Profile Management section
- Set processed groups
- Here you can define which groups are processed by Citrix Profile Management
- Only for the specified groups the Citrix Profile Management settings are processed
- If no group is stored, all users are processed
- Set excluded groups
- Defines which groups are excluded from Citrix Profile Management
- Process logons of local administrators
- When enabled, Citrix Profile Management handles local administrator logins the same way as non-administrator logins
- Set path to user store
- Specification of the path to the folder of the user memory
- Can be populated with the known variables (e.g. #samaccountname# or !ctx_OSNAME!)
- Migrate user store
- This option can be used to move an existing storage with profiles
- For this purpose, the path to the old Profile Store (source) must be entered under Migrate user store
- The new profile store (target) must then be stored under Set path to user store
- When logging in, Profile Management checks if a profile exists in the source and copies it to the new Profile Store.
- If there is no old profile in the source directory when logging in, a new profile will simply be created in the target directory.
- Enable active write back
- This writes the profile changes back to the user store during the runtime of the user’s session to avoid data loss
- This is to be taken with caution, since it strongly occupies the user store (my recommendation is here not to activate this simply!).
- Enable active write back registry
- Registry entries are written back to the User Store during the user’s session to prevent data loss
- Similar to Enable active write back use with caution
- Enable offline profile support
- Profiles are cached locally and can be used when not connected to the User Store

Profile Container Settings
These options control the settings of the Profile Container section in Citrix Profile Management.
- Enable Profile Container
- When enabled, Citrix Profile Management maps the listed folders of the profile stored in the network to containers so that there is no copy of the folders in the local profile
- At least one folder must be stored, which is to be included in the profile container
- Enable Folder Exclusions for Profile Container
- The listed folders are excluded from the Profile Container
- Enable Folder Inclusions for Profile Container
- Profile Management keeps the listed folders in the Profile Container when the parent folders have been excluded
- The folders in this list must be subfolders of the excluded folders
- This option must be used in combination with the Enable Folder Exclusions for Profile Container option
- Enable File Exclusions for Profile Container
- The listed files are excluded from the Profile Container
- Enable File Inclusions for Profile Container
- Profile Management keeps the listed files in the profile container when the parent folders have been excluded
- This option must be used in combination with the Enable Folder Exclusions for Profile Container option
- Enable Local Cache for Profile Container
- When this feature is enabled, each local profile serves as a local cache for its Profile Container
- When Profile Streaming is used, locally cached files are created on demand
- Otherwise, the cached files are created during user login

Profile Handling
These settings control the Profile Handling of Citrix Profile Management.
- Delete local cached profiles on logoff
- It deletes the locally cached profiles when the user logs off
- Set delay before deleting cached profiles
- Activation of a delay (in seconds) before cached profiles are deleted at logout
- Supported values: 0-600
- Enable Migration of Existing Profiles
- Existing Windows profiles are migrated to Citrix Profile Management upon login
- Automatic migration of existing application profiles
- If this option is enabled, existing application profiles are migrated automatically when a user logs in and there is no user profile in the User Store
- This is done by automatic detection in the following locations:
- Under %userprofile%\Local\Appdata\ and %userprofile%\Roaming\Appdata
- The Microsoft folders containing information about the current operating system platform are ignored
- Registration key under HKCU\Software and HKCU\Software\Wow6432Node
- Enable local profile conflict handling
- Configures how Citrix Workspace Environment Management handles cases where Profile Management and the Windows Profile conflict
- Enable template profile
- Path to the template profile, if one is to be used
- Template profile overrides local profile
- The template profile overwrites any existing local profiles of the user
- Template profile overrides roaming profile
- The template profile overwrites any existing roaming profiles of the user
- Template profile used as Citrix mandatory profile for all logons
- If this option is enabled, the template profile overwrites all other existing profiles
- The profile is practically read-only and does not accept any changes after logout

Advanced Settings
Under this tab, the Advanced Settings for the Citrix Profile Management can be configured.
- Set number of retries when accessing locked files
- Determines how often the agent retries access to locked files
- Set directory of the MFT cache file
- Allows to specify the directory of the MFT cache file
- This option is deprecated and will be removed in the future
- Enable application profiler
- Enabling application-based profile handling
- Only the settings defined in the definition file are synchronized
- Process Internet cookie files on logoff
- If this option is enabled, outdated cookies are deleted when logging out
- Delete redirected folders
- The local copies of the redirected folders are deleted
- Disable automatic configuration
- If enabled, the Automatic configuration is disabled
- Log off user if a problem is encountered
- Users are logged out in case of problems and are not switched to a temporary profile
- Customer experience improvement program
- The Customer Experience Improvement Program (CEIP) is active
- Enable multi-session write-back for profile containers
- If this option is enabled, Citrix Profile Management saves changes in multisession scenarios for both FSLogix Profile Container and Citrix Profile Management Profile Container
- If the same user starts multiple sessions on different machines, the changes made in each session are synchronized and stored on the user’s Profile Container Store
- Replicate user stores
- During login and logout, the profile data is replicated to the specified paths
- The user store paths are set in addition to the one specified in the Set path to user store setting
- Customize storage path for VHDX files
- Allows to specify a separate path for saving VHDX container
- By default, the VHDX containers are stored in the User Store
- Enable search index roaming for Microsoft Outlook users
- When this function is enabled, the user-specific Microsoft Outlook Offline Folder file (*.ost) and the Microsoft search database are moved together with the user profile
- This improves the user experience when searching for emails in Microsoft Outlook
- Outlook search index database – backup and restore
- If this option is enabled, CPM automatically saves a backup copy of the last known good copy of the search index database
- In case of corruption, Citrix Profile Management falls back to this copy
- The database no longer needs to manually re-index when the search index database becomes corrupted

Log Settings
These options control the Log Settings of the Citrix Profile Management.
- Enable Logging
- Enables / disables logging of profile management operations
- Configure Log Settings
- What types of events should be included in the logs
- Set Maximum Size of Log File
- Allows to specify a maximum size in bytes for the log file
- Set Path to Log File
- Specification of the location where the log file is to be created

Registry
These options control the Registry settings of Citrix Profile Management.
- NTUSER.DAT Backup
- If enabled, Citrix Profile Management creates a backup copy of the NTUSER.DAT file, which is the last known copy
- When CPM detects corruption, it uses the last backup copy known to be good to restore the profile
- Enable Default Exclusion List
- Default list of registry keys in HKCU Hive that are not synchronized with user profile
- Enable Registry Exclusions
- Registry settings in this list are forcibly excluded from Citrix Profile Management
- Enable Registry Inclusions
- Registration settings in this list are included in CPM
! Important !
If Enable Registry Inclusion is activated, only the specified registry settings are synchronized, the rest of the registry is excluded ! This can lead to defective registrations in the profile!

File System
These options control the file and folder exclusions for Citrix Profile Management.
- Enable Logon Exclusion Check
- It configures what CPM does when a user logs in and a profile in the user store contains excluded files or folders
- If this option is disabled, the default behavior is that excluded files or folders are still synchronized at logon (The defined exclusion pulls only at logoff)
- Synchronize excluded files or folders
- Citrix Profile Management synchronizes the excluded files and folders from the user path to the Local Profile when logging in
- Ignore excluded files or folders
- Citrix Profile Management ignores the excluded files and folders at login
- Delete excluded files or folder
- Citrix Profile Management deletes the excluded files and folders from the respective user path upon login
- Synchronize excluded files or folders
- Enable Default Exclusion List – Directories
- If enabled, the specified default list of folders will be excluded and not synchronized to the profile
- The folders in the list can still be disabled individually
- Enable File Exclusions
- Definition of specific files that will be closed from the profile
- Paths in this list must be relative to the user profile
- Wildcards can be used, but are only allowed for file names
- The list is initially prefilled with default exclusions for Windows 7, but can also be prefilled with default exclusions for Windows XP
- Enable Folder Exclusions
- Definition of specific folders to be excluded from the profile
- Paths in this list must be relative to the user profile
- Wildcards can be used, but are only allowed for file names
- The list is initially prefilled with default exclusions for Windows 7, but can also be prefilled with default exclusions for Windows XP

- Profile Cleansing
- The Profile Cleansing button opens a wizard that can be used to clean existing profiles based on the Folder and File Exclusion settings
- Scan Profiles Folder
- Searches the specified folder with the specified recursion settings to find user profiles, and then displays all found profiles
- Cleanse Profile(s)
- This button cleans the selected profiles according to the folder exclusion settings
- Manage Filters
- Here are the current folders Exclusion listed and can also be customized or extended
Synchronization
These options control the Synchronization settings of the CPM.
- Enable Directory Synchronization
- The listed folders are synchronized with the user memory over the runtime of the session
- This ensures that the users always get the latest versions of the folders
- Paths in this list must be relative to the user profile
- Wildcards can be used, but are only allowed for file names
- Enable File Synchronization
- The listed files are synchronized with the user memory
- This ensures that users always receive the latest versions of the files
- If files have been modified in more than one session, the most recent files are stored in the user memory
- Paths in this list must be relative to the user profile
- Wildcards can be used, but are only allowed for file names
- Enable Folder Mirroring
- If this option is enabled, the listed folders will be mirrored to the user memory when logging off
- Files in mirrored folders always overwrite files stored in user memory when you log out of the session, regardless of whether they have been modified
- If there are additional files or subfolders in the user store compared to the local versions in mirrored folders, these additional files and subfolders are deleted from the user store when you log out of the session
- Accelerate Folder Mirroring
- If enabled, mirrored folders are stored on a VHDX-based virtual hard disk (MirrorFolders.vhdx)
- A folder called MirrorFolders is created in the user memory and the VHDX files are placed in it
- Simultaneous login to multiple sessions results in multiple diff disks (Diff_1_<Worker-Name.vhdx>
- Enable Large File Handling
- Large files are redirected to user store, so there is no need to synchronize these files over the network

Streamed User Profiles
These options control the Streamed User Profiles settings.
- Enable Profile Streaming
- If this option is disabled, none of the settings in this section will be processed
- Enable Profile Streaming for Folders
- If this option is enabled, the folders are retrieved only when they are accessed
- This setting eliminates the need to browse all folders during user login, saving bandwidth and reducing the time needed to synchronize files
- Always Cache
- If this option is enabled, files with the specified size from Cache files this size or larger (megabytes) are always cached
- Set timeout for pending area lock files
- Releases files so that they are written from the pending area back to the user memory after the specified time
- This is necessary when the user memory remains locked because a server stops responding
- Set streamed user profile groups
- This list defines for which user groups Streamed User Profiles should be used
- Enable Profile Streaming Exclusion List – Directories
- Citrix Profile Management does not stream folders in this list
- All folders are immediately fetched from the user storage to the local computer when users log in
- This is needed for some software that needs all data at session start and therefore does not support a streamed user profile

Cross-Platform Settings
These options control the Cross-Platform Settings, allowing operating system and application options to be ported. However, only older operating systems are supported (Windows XP, Windows 7, Windows Vista, Windows Server 2003, Windows Server 2008 and Windows Server 2008 R2).
- Enable cross-platform settings
- If this option is disabled, none of the settings in this section will be processed
- Set cross-platform settings groups
- Specifying user groups for which cross-platform profiles are used
- Set path to cross-platform definitions
- Specifying the definition file for cross-platform profiles
- Set path to cross-platform setting store
- Path to the cross-platform settings
- Enable source for creating cross-platform settings
- Defines this as the source platform for cross-platform settings

Security
The Security settings define, for example, which applications users are allowed to run and which are not.

Application Security
Under Application Security all rules of the subcategories are listed.
- Process Application Security Rules
- When this option is selected, the Application Security tab controls are enabled, and the agent processes rules from the current configuration set and converts them to AppLocker rules on the host
- If this option is not selected, the Application Security tab controls are disabled and the agent does not create new rules
- However, the previously created AppLocker rules are not updated and therefore older submitted rules are still active
- Process DLL Rules
- When this option is selected, the WEM Agent processes DLL rules from the current configuration set and converts them to AppLocker DLL rules on the host
- This option is only available if Process Application Security is enabled
- If DLL rules are to be used, DLL rules should be created beforehand, with the Allow permission, for all DLLs used by allowed applications
- When DLL rules are used, the user experience can be compromised because each DLL that an app loads is checked before it is allowed to run.
- Overwrite
- The last processed rules overwrite the previously processed rules
- Merge
- The new rules are merged with existing rules
- When conflicts occur, the last processed rules overwrite the previously processed rules

Import AppLocker Rules
Allows rules exported from AppLocker to be imported into Workspace Environment Management. Imported Windows AppLocker settings are added to the existing rules on the Security tab. Any invalid rules are automatically deleted and listed in a report dialog.

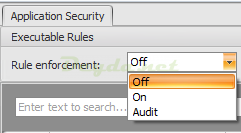
Rule enforcement
In each Application Security subcategory, you can define the Rule Enforcement setting. This allows you to control how AppLocker enforces all rules in this collection on the agent host.

- Off
- Created rules on the target system are not applied

- On
- Created rules on the target system are activated

- Audit
- Rules are created on the target system and set to audit, i.e. they are in an inactive state on the agent host
- When a user runs an app that violates an AppLocker rule, the app is allowed to run and the information about the app is added to the AppLocker event log

Executable Rules
Rules associated with an application and containing .exe or .com extensions.

Via Edit the existing rules can be edited and via Delete single marked rules can be deleted.

New manual rules can be created via Add Rule or existing default rules via Add Default Rule.
Add Rule
- Name
- The display name of the rule as it appears in the list
- Description
- Additional information about the resource
- Type
- Path
- The rule can be defined with a file or folder path
- Publisher
- The rule can be defined using a publisher
- Hash
- A hash value can be stored
- Path
- Permissions
- Status of the rule (Allow/ Deny)
- If Deny it will not be added to the user in the session, even if the object is assigned
- Assignments
- The usual Windows selection keys can be used to make a multiple selection or all objects are selected via Select All
- The users must already be in the list of Workspace Environment Management Users (from Active Directory Objects)

- Path
- Entering a file path or a folder path to which the rule should apply
- When a folder is selected, the rule is applied to all files inside and below this folder

- Publisher
- A signed reference file can be specified to be used as a reference for the rule
- With the Publisher Info slider, the degree of property matching can be set
- Use custom values
- After activation the fields can be filled manually


- Hash
- Input of a file or folder to be considered as reference hash value

- Exception
- Adding desired exceptions
- Under Add Exception the type can be selected


Windows Rules
Rules that contain installation file formats (.msi, .msp, .mst) and controls the installation of files.

Via Edit the existing rules can be edited and via Delete single marked rules can be deleted.
New manual rules can be created via Add Rule or existing default rules via Add Default Rule.
Add Rule
- Name
- The display name of the rule as it appears in the list
- Description
- Additional information about the resource
- Type
- Path
- The rule can be defined with a file or folder path
- Publisher
- The rule can be defined using a publisher
- Hash
- A hash value can be stored
- Path
- Permissions
- Status of the rule (Allow/ Deny)
- If Deny it will not be added to the user in the session, even if the object is assigned
- Assignments
- The usual Windows selection keys can be used to make a multiple selection or all objects are selected via Select All
- The users must already be in the list of Workspace Environment Management Users (from Active Directory Objects)

- Path
- Entering a file path or a folder path to which the rule should apply
- When a folder is selected, the rule is applied to all files inside and below this folder

- Publisher
- A signed reference file can be specified to be used as a reference for the rule
- With the Publisher Info slider, the degree of property matching can be set
- Use custom values
- After activation the fields can be filled manually

- Hash
- Input of a file or folder to be considered as reference hash value

Scripts Rules
Controls the processing of script files (.ps1, .bat, .cmd, .vbs, .js).

Via Edit the existing rules can be edited and via Delete single marked rules can be deleted.
New manual rules can be created via Add Rule or existing default rules via Add Default Rule.
Add Rule
- Name
- The display name of the rule as it appears in the list
- Description
- Additional information about the resource
- Type
- Path
- The rule can be defined with a file or folder path
- Publisher
- The rule can be defined using a publisher
- Hash
- A hash value can be stored
- Path
- Permissions
- Status of the rule (Allow/ Deny)
- If Deny it will not be added to the user in the session, even if the object is assigned
- Assignments
- The usual Windows selection keys can be used to make a multiple selection or all objects are selected via Select All
- The users must already be in the list of Workspace Environment Management Users (from Active Directory Objects)

- Path
- Entering a file path or a folder path to which the rule should apply
- When a folder is selected, the rule is applied to all files inside and below this folder

- Publisher
- A signed reference file can be specified to be used as a reference for the rule
- With the Publisher Info slider, the degree of property matching can be set
- Use custom values
- After activation the fields can be filled manually

- Hash
- Input of a file or folder to be considered as reference hash value

- Exception
- Adding desired exceptions
- Under Add Exception you can select the type

Packaged Rules
Rules that contain packaged apps, also known as Universal Windows apps. In packaged apps, all files within the app package have the same identity. Therefore, one rule can control the entire app. Workspace Environment Management supports only Publisher rules for packaged apps.

Via Edit the existing rules can be edited and via Delete single marked rules can be deleted.
New manual rules can be created via Add Rule or existing default rules via Add Default Rule.
Add Rule
- Name
- The display name of the rule as it appears in the list
- Description
- Additional information about the resource
- Permissions
- Status of the rule (Allow/ Deny)
- If Deny it will not be added to the user in the session, even if the object is assigned
- Assignments
- The usual Windows selection keys can be used to make a multiple selection or all objects are selected via Select All
- The users must already be in the list of Workspace Environment Management Users (from Active Directory Objects)

- Publisher
- A signed reference file can be specified to be used as a reference for the rule
- With the Publisher Info slider, the degree of property matching can be set
- Use custom values
- After activation the fields can be filled manually

- Exception
- Adding desired exceptions
- Under Add Exception the type can be selected
DLL Rules
Rules for securing the following formats: .dll, .ocx

Via Edit the existing rules can be edited and via Delete single marked rules can be deleted.
New manual rules can be created via Add Rule or existing default rules via Add Default Rule.
Add Rule
- Name
- The display name of the rule as it appears in the list
- Description
- Additional information about the resource
- Type
- Path
- The rule can be defined with a file or folder path
- Publisher
- The rule can be defined using a publisher
- Hash
- A hash value can be stored
- Path
- Permissions
- Status of the rule (Allow/ Deny)
- If Deny it will not be added to the user in the session, even if the object is assigned
- Assignments
- The usual Windows selection keys can be used to make a multiple selection or all objects are selected via Select All
- The users must already be in the list of Workspace Environment Management Users (from Active Directory Objects)

- Path
- Entering a file path or a folder path to which the rule should apply
- When a folder is selected, the rule is applied to all files inside and below this folder

- Publisher
- A signed reference file can be specified to be used as a reference for the rule
- With the Publisher Info slider, the degree of property matching can be set
- Use custom values
- After activation the fields can be filled manually
- Hash
- Input of a file or folder to be considered as reference hash value

- Exception
- Addition of required exceptions
- Under Add Exception the type can be chosen

Process Management
These settings allow you to add certain processes to the list of allowed or blocked processes.

All settings must be confirmed with Apply on the respective tab.
Process Management
This option works only if the agent is running in the user’s session. For this, the agent type must be set to UI (Advanced Settings > Configuration > Main Configuration).
- Enable Process Management
- Only if this is activated, the settings under Process BlackList and Process WhiteList are processed

Process BlackList
These settings can be used to block certain processes.
- Enable Process BlackList
- Activated, the processes on the list are blocked
- The processes must be added using their executable name (e.g. cmd.exe)
- Exclude Local Administrators
- The blocked processes do not apply to local administration accounts
- Exclude Specified Groups
- Enables the exclusion of certain user groups

Process WhiteList
This setting allows certain processes to be included in the list of allowed processes. The BlackList and the WhiteList are mutually exclusive.
- Enable Process WhiteList
- Processes from the list are processed
- The processes must be added using their executable name (e.g. cmd.exe)
- If this option is enabled, all processes that are not in the white list are automatically blocked
- Exclude Local Administrators
- The local administration accounts can start all processes
- Exclude Specified Groups
- Enables the exclusion of certain user groups and they can then start all processes

Privilege Elevation
The Privilege Elevation feature can be used to elevate the privileges of non-administrative users to an administrator level, which is required for some executable files. This allows users to launch these executables as if they were members of the Administrators group.
- Process Privilege Elevation Settings
- Determines whether the Privilege Elevation function should be activated
- When enabled, the agents can process the Privilege Elevation settings and the other options become available
- Do Not Apply to Windows Server OSs
- Enabled, Privilege Elevation is not applied to Windows Server OS and the stored rules are not used.
- Enforce RunAsInvoker
- All executables are run under the current Windows account and users are not prompted to run this as administrators

Executable Rules
Rules associated with an application and containing .exe or .com extensions.

Via Edit the existing rules can be edited and via Delete single marked rules can be deleted.

New manual rules can be created via Add Rule.
Add Rule
- Name
- The display name of the rule as it appears in the list
- Description
- Additional information about the resource
- Type
- Path
- The rule can be defined with a file path
- Publisher
- The rule can be defined using a publisher
- Hash
- A hash value can be stored
- Path
- Start Time
- Specification of a time when the agents should start applying the rule
- The time format is HH:MM
- The time is based on the agent’s time zone
- End Time
- Time at which the agents should stop applying the rule
- The time format is HH:MM
- From the specified time, the agents no longer apply the rule
- The time is based on the agent’s time zone
- Add Parameter
- Allows to restrict the Privilege Elevation feature to executables that match the specified parameter
- Enable Regular Expressions
- Should Regular Expressions be used to expand the criterion
- Apply to Child Processes
- The rule is applied to all child processes that start the executable file
- Privilege Elevation can be defined even further:
- Apply only to executables in the same folder
- The rule is applied only to executable files located in the same folder
- Apply only to signed executables
- The rule is applied only to signed executables
- Apply only to executables of the same publisher
- The rule is applied only to executables that have the same publisher information
- This setting does not work with Universal Windows Platform (UWP) apps
- Assignments
- The usual Windows selection keys can be used to make a multiple selection or all objects are selected via Select All
- The users must already be in the list of Workspace Environment Management Users (from Active Directory Objects)

- Path
- Entering a file path or a folder path to which the rule should apply
- When a folder is selected, the rule is applied to all files inside and below this folder

- Publisher
- A signed reference file can be specified to be used as a reference for the rule
- With the Publisher Info slider, the degree of property matching can be set
- Use custom values
- After activation the fields can be filled manually


- Hash
- Input of a file or folder to be considered as reference hash value
Windows Installer Rules
Collection of rules for installation files with .msi and .msp extensions.
- Privilege elevation applies only to Microsoft’s msiexec.exe
- Therefore, all .msi and .msp Windows Installer files should use msiexec.exe

Via Edit the existing rules can be edited and via Delete single marked rules can be deleted.
New manual rules can be created via Add Rule.
Add Rule
- Name
- The display name of the rule as it appears in the list
- Description
- Additional information about the resource
- Type
- Path
- The rule can be defined with a file path
- Publisher
- The rule can be defined with a publisher
- Hash
- A hash value can be stored
- Path
- Start Time
- Specifying a time when the agents should start applying the rule
- The time format is HH:MM
- The time is based on the agent’s time zone
- End Time
- Time at which the agents should stop applying the rule
- The time format is HH:MM
- From the specified time, the agents no longer apply the rule
- The time is based on the agent’s time zone
- Add Parameter
- Allows to restrict the Privilege Elevation feature to executables that match the specified parameter
- Enable Regular Expressions
- Should Regular Expressions be used to expand the criterion
- Apply to Child Processes
- The rule is applied to all child processes that start the executable file
- Assignments
- The usual Windows selection keys can be used to make a multiple selection or all objects are selected via Select All
- The users must already be in the list of Workspace Environment Management Users (from Active Directory Objects)

- Path
- Entering a file path or a folder path to which the rule should apply
- When a folder is selected, the rule is applied to all files inside and below this folder

- Publisher
- A signed reference file can be specified to be used as a reference for the rule
- With the Publisher Info slider, the degree of property matching can be set
- Use custom values
- After activation the fields can be filled manually


- Hash
- Input of a file or folder to be considered as reference hash value

Self-Elevation
With Self-Elevation, privilege elevation can be automated for specific users without the need to specify the exact executables in advance.
These users can request self-elevation for any file by simply right-clicking on the file and then selecting Run with administrator privileges from the subsequent context menu.
After that, a prompt appears asking the user to specify a reason for the release. The WEM Agent does not check the reason! The reason for the self-elevation is stored in the database for checking purposes.
If the criteria are met, the self-elevation is applied and the files are successfully executed with administrator privileges.
Self-elevation applies to files with the following formats: .exe, .msi, .bat, .cmd, .ps1 and .vbs.
All settings must be confirmed with Apply.
- Enable Self-Elevation
- Enables the agent for processing self-elevation settings
- Other options on the Self-Elevation tab are made available
- The Run with administrator privileges option is made available in the context menu when users right-click a file
- Permissions
- Allows the creation of Allow or Deny lists for files that users may or may not start via self-elevation
- Allow
- Creates Allow list for files that allow users Self-Elevation
- Deny
- Creates a deny list for files where users are not allowed to perform self-elevation
- Add Condition
- Files can be added to the Allow or Deny list by Path, Hash or Publisher

- Start Time
- Specifying a time when the agents should start applying the rule
- The time format is HH:MM
- The time is based on the agent’s time zone
- End Time
- Time at which the agents should stop applying the rule
- The time format is HH:MM
- From the specified time, the agents no longer apply the rule
- The time is based on the agent’s time zone
- Add Parameter
- Allows to restrict the Privilege Elevation feature to executables that match the specified parameter
- Enable Regular Expressions
- Should Regular Expressions be used to expand the criterion
- Apply to Child Processes
- The rule is applied to all child processes that start the executable file
- Assignments
- The usual Windows selection keys can be used to make a multiple selection or all objects are selected via Select All
- The users must already be in the list of Workspace Environment Management Users (from Active Directory Objects)

Process Hierarchy Control
The Process Hierarchy Control function controls whether certain child processes can be started by their parent processes in parent-child scenarios. Rules are created by defining the parent processes and then creating an Allow or Deny list for their child processes.
- Enable Process Hierarchy Control
- Controls whether the Process Hierarchy Control function should be activated
- The other options on the Process Hierarchy Control tab become available and the settings configured there can take effect
- This feature is only available in a Citrix Virtual Apps environment
- Hide Open With from Context Menu
- The Open With from Context Menu option of the right mouse button is displayed or hidden
- If option is enabled, the menu option is hidden in the user interface
- If disabled, the option is visible and users can start a process with it
- The Process Hierarchy Control function does not apply to processes started via the Open with option
- It is recommended to enable this setting to prevent applications from starting processes via system services that have no relation to the current application hierarchy

Via Edit the existing rules can be edited and via Delete single marked rules can be deleted.
New manual rules can be created via Add Rule.
- Name
- The display name of the rule as it appears in the list
- Description
- Additional information about the resource
- Type
- Path
- The rule can be defined with a file path
- Publisher
- The rule can be defined using a publisher
- Hash
- A hash value can be stored
- Path
- Add Child Processes to Block List
- A block list can be defined for corresponding child processes after a rule has been configured for their parent processes
- A block list prohibits only the execution of the specified processes, while other processes may be executed
- Add Child Processes to Allow List
- It is possible to define an Allow List for the corresponding child processes after configuring a rule for the parent processes
- An Allow List allows only the specified processes to run, while other processes are not allowed to run
- Set Priority
- The priority determines the order in which the configured rules are processed
- The larger the value is, the higher the priority is
- In the event of a conflict, the rule with the higher priority takes precedence
- Assignments
- The usual Windows selection keys can be used to make a multiple selection or all objects are selected via Select All
- The users must already be in the list of Workspace Environment Management Users (from Active Directory Objects)

- Path
- Entering a file path or a folder path to which the rule should apply
- When a folder is selected, the rule is applied to all files inside and below this folder
- Publisher
- A signed reference file can be specified to be used as a reference for the rule
- With the Publisher Info slider, the degree of property matching can be set
- Use custom values
- After activation the fields can be filled manually
- Hash
- Input of a file or folder to be considered as reference hash value

- Exception
- Addition of required exceptions
- Under Add Exception the type can be selected
Hi http://www.deyda.net admin, Your posts are always well-referenced and credible.